AS3X+ Setup Guide
This guide will provide an overview to the AS3X+ parameters/interface and model setup
Supported Devices
Transmitters
Supported transmitters include the following
iX20 (with app version 1.10.11+)
iX14 (with app version 1.02.11+)
iX12 (with app versijon 1.20.11+)
All NX Radios (with firmware version 3.13+)
Gen 2 DX Radios (with firmware version 2.10+)
Receivers
Supported receivers include the following (with firmware 3.4.0+)
AR630
AR631
AS6420A
AR637T
AR637TA
AR8360T
AR10360T
AR10410T + Synapse Module
AR14410T + Synapse Module
AR20410T + Synapse Module
Parameter Overview
These parameters can be found in Forward Programming in Gyro Settings > AS3X Settings
AS3X+ Gains
Location: Forward Programming > Gyro Settings > AS3X Settings > AS3X Gains
Description: Adjusts the strength of the gyro response in relation to model movements due to external forces.
Values: 0 to 100 %
Notes:
Increasing this value too much will cause oscillations.
Priority
Location: Forward Programming > Gyro Settings > AS3X Settings > Priority
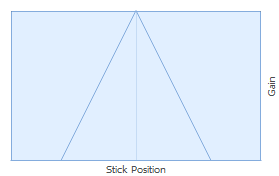
Description: AS3X+ Priority causes a reduction in AS3X+ Gain based on the user stick input. In other words, the more stick input applied, the less AS3X+ Gain there is. This helps prevent AS3X+ from interfering with user inputs.
Values: 0 to 200 (Default = 140)
Examples:
Priority = 0 means no effect on AS3X+ gain with stick inputs.

Priority = 100 means gain ranges from 100% to 0% as the stick input moves from 0% to 100%.
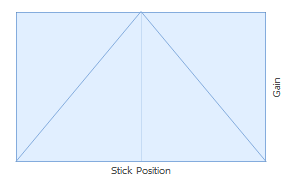
Priority = 140(Default) means gain ranges from 100% to 0% as the stick input moves from 0% to 60%, and 0% gain for the rest of the 60% to 100% stick input.
Heading
Location: Forward Programming > Gyro Settings > AS3X Settings > Heading
Description: Adjusts the strength of gyro trying to hold the models current angle. Position is reset by user inputs.
Values: 0 to 100% (Default = 0)
Notes:
This setting is not available unless a flight mode channel is assigned.
This setting will be ignored when a SAFE mode is enabled.
A warning is included for Yaw, as most people bank and yank to turn, which means Yaw heading hold does not get reset and can cause unwanted behavior.
Stop Lock Rate
Location: Forward Programming > Gyro Settings > AS3X Settings > Stop Lock/Release Rate
Description: This parameter allows users to tune the stop response of the model without the need to reduce gyro gains/performance.
Values: 1 to 100
Notes:
Low values reduce the stop induced by the gyro when re-centering the stick.
It’s possible to inadvertently set too much AS3X+ gain if this value is too low. As the response of the gyro after releasing/centering the stick might take longer than it takes the model to stop on its own.
Higher values increases the gyro’s effect on stops.
Too high of a value can cause bounces/oscillations even with low gyro gains.
Stop Release Rate
Location: Forward Programming > Gyro Settings > AS3X Settings > Stop Lock/Release Rate > Next Page
Description: This parameter can help retain gyro response/performance when quick minor stick inputs are made.
Values: 1 to 100
Notes:
Too low of a value can induce an expo effect as a stick input wont immediately reduce the gyro’s effect.
Too low of a value can cause unwanted gyro response/bounce from quick momentary stick movements. We’ve noticed this to be an issue on Yaw, which is why the default is higher than the other axis.
Too high of a value can cause the gain to go away quickly on a short/quick stick movement and increase overall delay on the model getting gains back optimally when re-centering the stick from a quick movement.
Too high of a value will not create unwanted reactions in natural flight behavior but could prevent stabilization kicking in optimally after short/quick stick inputs.
Gain Sensitivity
Location: Forward Programming > Gyro Settings > AS3X Settings > Gain Sensitivity
Description: This value multiplies your AS3X+ Gain value. It allows you to have a higher or lower gain range in case the initial 0 to 100% gain range isn't adequate for the model.
Values: 0.25x, 0.5x, 1x, 2x, 4x
Notes:
For better gain resolution, the gain sensitivity multiplier can be decreased if the gain values overall end up relatively low after flight testing (all values under around 40%)
Fixed/Adjustable Gain
Location: Forward Programming > Gyro Settings > AS3X Settings > Fixed/Adjustable Gain
Description: If Adjustable, your setting values are getting scaled by their assigned gain channel. If Fixed, the setting values stay as is, regardless of whether a gain channel has been assigned to them or not. Ideally, this setting should be changed from Adjustable to Fixed using the Capture Gains function.
Values: Fixed, Adjustable (Default = Adjustable)
The following AS3X+ settings are adjustable with a gain channel (visible by selecting the Next page option within the Fixed/Adjustable menu)
AS3X+ Gain
Heading Gain
Stop Lock Rate
Stop Release Rate
Notes:
These parameters are unique per flight mode, so make sure you have the desired flight mode/s selected before adjusting
Caution should be used if manually changing this setting from adjustable to fixed. The calculation of the actual gain value will not be done unless capture gain values is used.
Capture Gains
Location: Forward Programming > Gyro Settings > AS3X Settings > Capture Gyro Gains
Description: This function will calculate your effective gains/settings based on the currently set value, and your gain channel position. It will convert all your gains in the currently selected flight mode to Fixed, and adjust your gain values to those that were calculated. A preview of what values the gyro gains will be captured as is shown on the screen. Each setting type is previewed in additional Next pages.
Gain Channel Structure
Location: Forward Programming > Gyro Settings > System Setup > Gain Channel Select
Unlike previous parameters, these are configured in Gyro Settings > System Setup > Gain Channel Select
There is now a total of 10 gain channel slots, and each is customizable to affect a variety of settings. Note that only AS3X+ Normal Gain is automatically set to Adjustable after the first time setup (only in Gyro System 1). All other parameters are defaulted to Fixed and won’t get adjusted with a gain channel until changed to Adjustable.
Gain Channel: Channel being used for the selected gain channel slot.
Mode:
AS3X
SAFE
Axis:
Roll
Pitch
Yaw
All
Setting:
AS3X:
Normal Gain
Heading Gain
Stop Lock Rate
Stop Release Rate
SAFE:
Normal Gain
Gyro System: Gyro system that this channel affects (so for example, an AS3X+ Roll gain channel for Gyro System 1 won't affect Roll gain in other gyro systems).
Gyro Filter Level
Location: Forward Programming > Gyro Settings > System Setup > Next Page
Description: The Gyro Filter Level allows adjusting the strength of the software filtering for the gyro. This may either be increased in a high vibration model, or decreased in a low vibration model
Values: 1, 2 (Default), 3, 4
Notes:
Once changed, make sure to exit forward programming (to save) and then power cycle the receiver.
The default gyro filter level has been thoroughly tested on various model types (electric, edf, turbin, gas). However, some models might still require a change in the gyro level.
Higher gyro filter levels will increase response latency, which will in turn reduce the max achievable gains/stabilization performance. Therefore, it is best to not increase this value unless its necessary for the model.
Lower gyro filter levels will decrease response latency, which will in turn increase the max achievable gains/stabilization performance. However, the user must ensure that the model vibrations are as low as possible to prevent adverse effects.
Dynamic Response
Location: Forward Programming > Gyro Settings > AS3X Settings > Next Page
Description: This feature is a part of the AS3X+ improvements, but some may want to disable to allow models to show more of their natural stability.
Values: Act (Default), Inh
Notes:
Sailplane/glider users that use the models movements to determine presence of a thermal might prefer to disable this feature.
If the aircraft seems too “robotic” or “active” flying through turbulent air, you may want to try turning this off.
The aircraft may not track through the air as well, or feel as “locked in” with this disabled.
This is not a new feature addition to AS3X+. This was previously a hidden feature already in AS3X+ that we’re now giving users the option to disable.
Introduced on Jan 6, 2025 update.
AS3X Throttle Arm
Location: Forward Programming > Gyro Settings > AS3X Settings > Next Page
Description: Determines if setting throttle past 25% is required to “Arm” AS3X stability.
Values: Inh (Default), Act
Notes:
Before this parameter existed, the default system behavior required applying throttle to arm AS3X. New configurations on firmware that supports this feature will have it disabled by default. Updating a receiver that previously didn’t have this parameter will default to it being enabled.
Introduced on Jan 6, 2025 update.
Skip Gyro Cal (⚠️ USE WITH CAUTION!)
Location: Forward Programming > Gyro Settings > System Setup > Next Page
Description: Allows skipping/disabling gyro calibration on receiver startup. This will disable usage of SAFE and any of its related features, Heading Hold, and AS3X Throttle Arm.
Values: Inh (Default), Act
Notes:
WARNING: Disabling gyro calibration will disable SAFE and any of its related features, Heading Hold, and AS3X Throttle Arm
WARNING: Disabling gyro calibration has the potential to cause the model to drift when using just regular AS3X stabilization, as if it were out of trim.
If disabling gyro calibration, it is recommended to have a gyro off mode/gain to disable the gyro in flight in case there are any adverse effects.
Introduced on Jan 6, 2025 update.
First Time Setup
This section will go over the First Time Setup procedure for stabilization
Before starting note the following menu locations
iX Radio:
Model Setup menu is available on the bottom center area of the screen from the Dashboard
Model Adjust menu is available on the bottom left corner of the screen from the Dashboard
NX Radio:
Function List menu is available by pressing the scrollwheel while on the Dashboard
Make sure the model has already been fully setup on the radio side, and is flyable (actual flight testing/verification is preferable). Things like wing/tail type, subtrims, reversing, travel, absolute travel, etc should all be configured before continuing. You will also need an empty channel to assign a gain channel.
With the receiver on and bound, enter Forward Programming (iX: Model Adjust > Forward Programming, NX: Function List > Forward Programming)
In Forward Programming, got to Gyro Settings > First Time Setup. Confirm the model configuration prompt in the first 2 pages.
In the orientation setup screen there are two options.
Use the automatic orientation detection by setting the model level, select Continue, then point the model nose down 90 degrees offset from its level position and select Continue again.
Note that for this test, the model doesn’t have to be perfectly level in the first step, or perfectly pointing down in the second step. A margin of +/- 30 degrees should still result in a proper capture.
Skip this step to manually set orientation. This might be preferable on large models that are difficult to move/tilt while avoiding damage.
Confirm/Select the receiver/sensors orientation in relation to the model and select Continue.
Enter the Gain Channel Select menu.
For gain channel, choose the empty channel you wish to use for gain adjustment.
For switch, select the gain adjustment input (Trimmer, Knob/Slider, or switch. Preferable in the provided order)
If using a trimmer, make sure to lower its value all the way to -100% before flying.
For switch, be aware that -100% is gain off. 0% is half gain, and 100% is full gain. Switch in general is not recommended until you’ve first found adequate values with a trimmer/knob.
Select Next and then Apply. The receiver will reboot and first time setup should be complete.
Select “Connect” to enter Forward Programming again, then go to Gyro Settings > System Setup > Utilities > Gyro Response Test.
While in this page, move the model in the Roll, Pitch, and Yaw directions, and verify that the surface responses counteract the movements. When standing behind the model:
Rolling left should make the Left Aileron move Down, and Right Aileron move Up.
Pitching down should make the Elevator move Up.
Yawing left should make the Rudder move to the Right.
Once responses are verified, the first time setup is complete!
If directions are incorrect, make sure the model’s servo reversing on the radio was configured properly before setup. If corrections are made, go to Forward Programming > System Setup > Relearn Servo Settings, change All to Primary, and select Apply. This will retransfer the relevant transmitter model settings to the receiver.
Before flying, make sure the gain channel (switch, knob, trimmer, etc…) is currently set to -100% (-100% is gain off, 0% is half gain, and 100% is full gain).
Follow the Basic Tuning guide, and optionally the Advanced Tuning sections.
Basic Tuning (AS3X+ Normal Gain only, no flight modes)
Make sure the First Time Setup procedure has been followed to get the gyro setup.
Before flying, gyro response direction can be verified using the Gyro Response Test menu if it hasn’t been verified already (Forward Programming > Gyro Settings > System Setup > Utilities > Gyro Response Test).
Use the gain channel to adjust gain in flight and evaluate the gyro response. Gain should be tuned while flying near or at max speed.
In most cases, the user will probably be able to find a gain channel value that offers improved performance without additional tuning of individual settings.
Due to the addition of new parameter Stop Lock Rate delaying gain return from centering the stick, the gain might end up too high without the user noticing.
In initial flights, use short/quick stick inputs to induce movement in the model. Due to these delays, short/quick inputs will reduce gain much less, and will allow the model to stop more with the gyro as opposed to naturally.
An advanced method of addressing this is to temporarily increase Stop Lock Rate to 100% for all 3 axes. Then stick inputs can be used to evaluate the current gain. This will ensure having full or closer to full gain the moment the stick is released. Start with low gain and work up. If the model continuously oscillates/bounces more than once, then the AS3X+ gain is too high and needs to be reduced. One or two bounces are acceptable (see Example B below in the Advanced Tuning section), Once the gain is set the Stop Lock Rate can be reset back to defaults to remove any small oscillations.
This may not be an issue on windy days as the turbulence should help induce oscillations when the gain is too high.
If any movement other than Roll starts experiencing oscillations as gain is increased, Pitch and Yaw can be reduced in Gyro Settings > AS3X Settings > AS3X Gain.
If gain channel is all the way up and no oscillations can be induced in the model, the multiplier can be increased in Gyro Settings > AS3X Settings.
On the other hand, if the gain channel is barely increased and oscillations are observed, the gain multiplier should be decreased to provide a wider window of adjustment.
Once the desired gain is found, note the current value of the gain channel.
In the transmitter settings, change the gain channel assignment to a switch, and then using the radios Digital Switch setup menu, adjust the switch’s channel outputs to -100% for gyro off, and then another position to XX% (whatever value was noted in the previous step) for gyro on. Note: There are other methods of gain changes/disabling the gyro in flight. See Advanced Tuning section for more information.
Advanced Tuning AS3X+ Normal Gain
This Advanced Tuning section assumes having multiples channels available for flight modes and in air gain adjustments.
Following the procedure in the Basic Tuning section to find the proper gain multiplier will help to reduce the amount of time spent to fine tune the individual settings.
In Forward Programming, go to Gyro Settings > F-Mode Setup > FM Channel, and assign a switch/channel for flight modes.
Go back one page, set one flight mode/switch position with AS3X off/Inh. This will allow us to have a fallback off position just in case any settings start causing issues in flight.
Depending on user preference, settings can be adjusted with a channel or done after landing in-between flights. Adjusting the values in flight will allow for faster tuning.
AS3X+ Gain channel for Roll/Pitch/Yaw should already be assigned to a channel from the first time setup.
Assign a second Gain Channel slot to Stop Lock Rate for All axis (Gyro Settings > System Setup > Gain Channel Select > Gain Channel #2).
Gain Channel: Selected Channel and Switch. (aux trimmers or side levers work well for this adjustment)
Mode: AS3X
Axis: All
Setting: Stop Lock Rate
Gyro System: 1
Tune each axis individually with the following steps:
Set the desired flight mode in which tuning will be done.
In Gyro Settings > AS3X settings > AS3X Gains, set Roll to 100%. Leave the Pitch and Yaw gains at the captured value.
In Gyro Settings > AS3X settings > Fixed/Adjustable Gain set the Roll to Adjustable
In Gyro Settings > AS3X settings > Stop Lock/Release Rate set Stop Lock Rate: Roll to 100% (others can be left at defaults).
In the Gyro Settings > AS3X Settings > Fixed/Adjustable Gain > Next > Next menu, set Stop Lock Rate for Roll to adjustable and the rest to Fixed.
Exit forward programming.
With the AS3X+ gain channel all the way down (-100%), Stop Lock Rate channel set all the way up (+100%), and the flight mode set to your AS3X Off/Inh mode. Now start flying the model.
While in the air, switch into the “tuning” flight mode that we just configured. There should be no effect yet as the gain is at 0.
Start increasing the gain little by little while flying near or at max speed and applying/releasing the stick to test the gain for oscillations. If you get single bounces, this is fine. You want to increase your gain until you start getting multiple bounces, then bring it back down until you’re only getting one or two bounces. Note: Your gain number found in the basic tuning is a good place to start from.
Example A - 🛑 BAD Gain too high
Example B - Gain is just about right. Now reduce Stop Lock Rate
Example C -
 Gain and Stop Lock Rate are good!
Once you are happy with the AS3X+ gain start adjusting the Stop Lock Rate value. You can start reducing this little by little, doing the stick input test to induce bounces/oscillations. Keep reducing Stop Lock Rate until the bounces go away completely, or to where the stop behavior meets your desired personal preference.
If no channel is assigned, you’ll have to land in your AS3X Off/Inh flight mode, reset Stop Lock Rate to the default value, and test again. Raise the value if you want harder stops. Lower the value to get softer stops or reduce bouncing.
Once things are at a point where you like them for the axis currently being tested, land the model and in forward programming go to Gyro Settings>AS3X Settings>Capture Gyro Gains. This page will preview where your gain will be at once captured. Stop Lock Rate values can be seen by going two pages over. Use Capture Gyro Gains to lock these settings before moving to the next axis. You will need to do this for any page using adjustable gains.
Repeat the steps from 5.a. to 5.k. but replace Roll with the next axis and leave previously configured values untouched.
We suggest the order being Roll > Pitch > Yaw.
Note that once all axis are tuned following the above steps, some axis can couple/affect others during and/or after being tuned. Recheck all axis and fine tune the combination of the 3 if needed.
Once all AS3X+ values have been tuned for a specific flight mode, those gains can be copied to other flight modes if desired in the Gyro Settings > System Setup > Utilities > Copy Flight Mode Settings.
Advanced Tuning AS3X+ Heading Gain
To tune heading gain, it is important to follow the Advanced Tuning AS3X+ Normal Gain section first, as AS3X+ gains allow for higher heading gain without oscillations. You may end up reducing AS3X+ gains a little bit to allow getting higher heading gains.
We will also only cover tuning Roll and Pitch heading gains, as Yaw typically causes unintended flight behaviors. Typically, Yaw will hold heading due to flying using only Roll and Pitch (Yaw heading hold doesn’t reset unless a Yaw input is applied).
Note that tuning heading gain to its max potential might require a lot of back and forth depending on the models tendencies.
Once we’ve gone through the steps of setting up AS3X+ gains and flight mode channels, we’ll want to copy our AS3X+ settings to a separate flight mode to be used for our heading mode in the Gyro Settings > System Setup > Utilities > Copy Flight Mode Settings menu.
Make sure you have a reliable flight mode to fall back on (either an AS3X Off/Inh mode, or another mode already tuned that is known to work reliably).
In Gyro Settings > System Setup > Gain Channel, set up a Gain Channel slot for heading with the desired Gain Channel. An option here is to replace the AS3X+ Normal gain channel used previously if there are no intentions of using it again.
Gain Channel: Selected Channel and Switch. (aux trimmers or side levers work well for this adjustment)
Mode: AS3X
Axis: All
Setting: Heading Gain
Gyro System: 1
We’re now going to tune each axis individually with the following steps:
Set the desired flight mode in which tuning for Heading will be done.
In Gyro Settings > AS3X Settings > Heading, set Roll to 100% and the rest to 0.
In Gyro Settings > AS3X Settings > Fixed/Adjustable Gain, go to the next page which should be the Heading Gain section. Set Roll to Adjustable and leave the rest at fixed.
Exit forward programming.
Set the AS3X+ Heading Gain channel all the way down (-100%) and the flight mode to the off/tuned mode. Now start flying the model.
While in the air, switch into the “tuning” flight mode that we just configured. There should be no heading effect yet, as the gain is at 0 from our gain channel.
For Roll
Fly in a straight line near or at max speed, start increasing heading gain, and apply quick Roll stick inputs to look for bounces/oscillations.
Once you get bounces, back off a bit on the gain until they’re gone.
Test any desired flight maneuvers to evaluate if heading gain is where you want it.
A typical/simple maneuver we do for testing Roll gain is do a full flat circle with the model by applying only Yaw and possibly Pitch inputs (no Roll). With enough Roll gain, a full flat circle should be achievable using only Yaw and Pitch.
If the heading gain found above is adequate for your needs, you can skip to step “k”.
Otherwise, you’ll need to increase gain further to reach the holding strength you need. If you don’t get bouncing from the maneuvers, double check with quick/short stick inputs.
If you get continuous bouncing from a single input, you’ll need to lower the gain for now until its only one or two bounces.
If you get one or two bounces, leave the gain as is and go to step “3.j.”
For Pitch
Fly in a straight line near or at max speed, start increasing heading gain, and apply quick Pitch stick inputs to look for bounces/oscillations.
Once you get bounces, back off a bit on the gain until they’re gone.
Test any desired flight maneuvers to evaluate if heading gain is where you want it.
A typical/simple maneuver we do for testing Pitch gain is do a full flat circle with the model by applying only Yaw (No Roll as this should already be tuned). With enough Pitch gain, a full flat circle should be achievable using only Yaw.
Another test that can be done is flying in a straight line, pitching up slightly, then rolling the model to inverted (while applying no pitch input), and observing how much it dips when fully inverted. A good heading gain should be able to keep the model at the same level with little to no noticeable dip.
NOTE: This test can vary a lot across models, as some models require much more pitch input to maintain level flight inverted. Removing pitch bouncing from other flight maneuvers can be difficult when using the higher pitch heading gains required.
If the heading gain found above is adequate for your needs, you can skip to step “k”.
Otherwise, you’ll need to increase gain further to reach the holding strength you need. If you don’t get bouncing from the maneuvers, double check with quick/short stick inputs.
If you get continuous bouncing from a single input, you’ll need to lower the gain for now until its only one or two bounces.
If you get one or two bounces, leave the gain as is. We will try to address them adjusting other parameters.
If you have bouncing from the previous steps, continue with the following suggestions. Otherwise, if heading is performing properly for your current axis, skip to step “k”.
There are multiple ways to address bouncing on heading without having to reduce the heading gain itself.
AS3X+ Normal (Rate) gain:
This gain should’ve been tuned to its max before starting the heading gain tuning.
Try reducing AS3X+ Normal gain on the issue axis (5% at a time should be an adequate amount). If the bouncing doesn’t get better from reducing, then leave it ats original value. Otherwise, reduce until it stops getting better.
When tuning heading without AS3X+ Normal gain, usually adding some normal gain can help reduce stops. However, at our current stage with it already at its theoretical max, it is better to try reducing it.
Stop Lock Rate:
Try reducing Stop Lock Rate for the affected axis to remove bounces.
In addition to Stop Lock Rate, Heading mode has some additional logic to determine how fast gain should return after releasing the stick. This allows for reducing Stop Lock Rate lower than what was set in Normal AS3X+ mode while still having quick stops.
Due to this additional logic, you can get all the way down to 1 on Stop Lock Rate, and still have heading kick in quickly enough when the stick is released/centered.
Stop Release Rate:
Try increasing Stop Release Rate for the affected axis to remove bounces caused by quick/short stick inputs.
Stop Release Rate affects the speed at which gain is removed when a stick input is applied.
If Stop Release Rate is too small, it can result in a lack of gain reduction when quick/short stick inputs are applied. This results in the model remaining with high gains immediately when the stick is released to stop it.
Priority
Try increasing Priority for the affected axis to remove bounces.
A higher priority will result in a sharper drop in gain when stick input is applied.
This can result in quicker removal of gain with a stick input, as well as extending the time it takes for the gain to return when centering the stick as it will only start returning when the stick is even closer to the center.
If none of the above methods help with bounce removal, this typically only leaves reduction of heading gain as the only option to remove bounces.
Once things are at a point where you like them for the axis currently being tested, land the model and in forward programming go to Gyro Settings > AS3X Settings > Capture Gyro Gains. Going to the next page here will preview what your heading gain will be set to once captured.
Repeat the steps from 3.a. to 3.k. for Pitch substituting any Roll selections with Pitch in 3.b. and 3c and leave previously configured values untouched.
Note that once both axes are tuned following the above steps, some axis/axes can couple/affect others during and/or after being tuned. Recheck each axis and fine tune the combination of the two if needed.
Specific Model Type Considerations
3D Models
When tuning 3D models, the following changes are recommended after following the first time setup.
Increase priority for all three axis from 140 to 180 or more.
Due to having much higher expo on 3D models, higher priority will help compensate for stick inputs being seen as lower than they actually are by the receiver. Increasing priority helps compensate for this.
Additionally, 3D pilots might typically prefer less gyro intervention when applying inputs to control the model. Increased priority can also help here.
Increase Stop Release Rate (NOT LOCK RATE) for all three axis to 100.
Default Stop Release Rate can cause 3D models to have a delayed response to stick inputs due to the gyro momentarily fighting the model. Setting this to max can ensure getting rid of this effect.
Set the Gain Sensitivity down to 0.5 X from 1 X
Since 3D models are configured with high travel ranges and are extremely sensitive, the gyro gain will also be more sensitive. By reducing the gain multiplier, we are shifting our working gain window to a more appropriate range to maintain some level of decent gain adjustment resolution.
If the model starts oscillating even with very little gain increase on the gain channel, this can be further reduced to 0.25 X.
Relevant Videos
The Synapse Tutorials playlist has videos that are relevant to AS3X+ in general
The AS3X+ 3D Setup video shows some general guidelines for 3D plane tuning. Specifically the 3D Model considerations listed in the section above AS3X+ Setup Guide | Specific Model Type Considerations
AS3X+ Initial Setup and Tuning for 3D Airplanes
AS3X+ First Time Setup for ARF and PNP Aircraft
Spektrum AS3X+ Tutorial: How to Use Preset Model Files