AR637T 6-Channel DSMX AS3X & SAFE Telemetry Receiver (w/ SRXL2)
AR637TA (Not sold separately. Included in some BNF/RTF models)
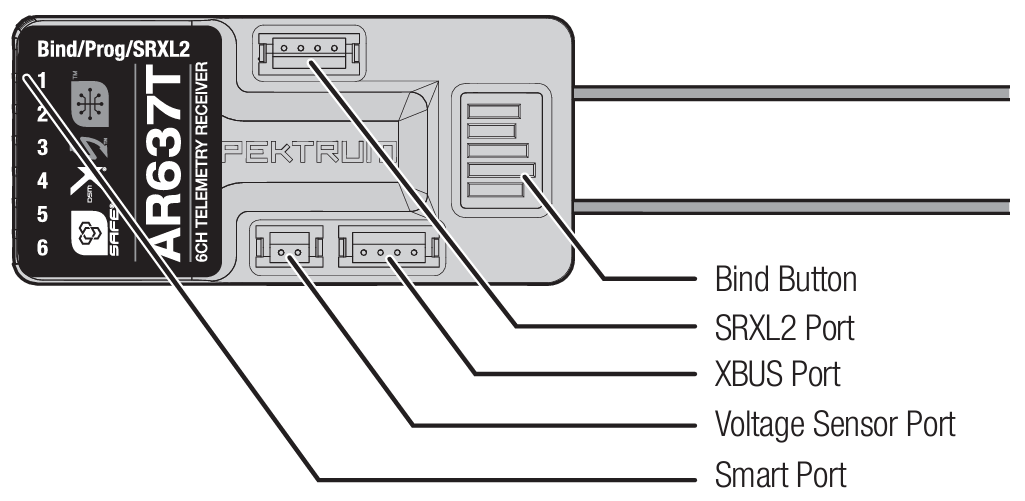
Receiver Diagram
Smart Throttle
With Smart Technology the normal servo connector delivers the throttle signal to the ESC, plus the ESC can send telemetry data like voltage and current back to the receiver. The AR637T receiver throttle port (Channel 1 port only) will automatically detect when a Smart compatible ESC is connected. ESCs with Smart and IC series connectors can also pass along battery data from compatible Spektrum Smart batteries. Spektrum Avian™ ESCs are compatible with the AR637T receiver for Smart Technology features. For Smart to function you must have a Smart ESC paired with a Smart telemetry receiver, and a Spektrum DSMX transmitter with telemetry. An update for your transmitter may be required for Smart features. See www.spektrumrc. com to register and update your transmitter. If a standard ESC or servo is plugged into the throttle port on the AR637T receiver, the throttle port will operate normally (PWM signal) like any conventional RC system.
Telemetry
The AR637T features full range telemetry and will provide receiver battery voltage, flight log data, and variometer* and altitude* data without any additional sensors. Additional telemetry devices such as voltage sensors can be connected to the volt port, and XBus telemetry sensors can be connected through the XBus connector. Every XBus telemetry device has two XBus ports, and XBus telemetry sensors can be connected in a daisy chain in any order.
*TIP: AR637TA receivers included with BNF models do not have a built-in pressure sensor for altitude and vertical speed data (variometer) measurements. If you want to add altitude and variometer to an AR637TA, an external sensor (SPMA9589) can be connected to the XBus system.
The AR637T is not compatible with the Spektrum Temperature Sensor (SPMA9571)
Receiver Installation/Mounting
1. Mount the receiver using double-sided servo tape. The receiver may be mounted upright, upside down or on its side, but it should be square with the fuselage in its mounting position. The receiver cannot be mounted at an odd angle.
TIP: For SAFE setups, install the receiver as close to the center of gravity of the aircraft as practical.
2. Connect the servos to their respective ports on the receiver using the chart below.
CAUTION: Incorrect installation of the receiver could cause a crash. Always perform a control surface check and AS3X control surface response test before flying a new setup, or after any setup changes.
Default Channel Assignments
Port | Function |
|---|---|
Bind/Prog/SRXL2 | Bind, Aux Device Support, Program |
1 | Throttle (Smart Throttle) |
2 | Aileron |
3 | Elevator |
4 | Rudder |
5 | Gear |
6 | Aux 1 |
IMPORTANT: When using Y-harness or servo extensions with Spektrum equipment, do not use reversing harnesses. Using reversing Y-harnesses or servo extensions may cause servos to operate erratically or not function at all.
Antenna Installation
The AR637T receiver has coaxial style antennas. We recommend installing the antennas oriented 90º from each other and as far as possible from metal, batteries, carbon fiber or fuel tanks to maximize signal reception performance.
NOTICE: Do not cut, kink, or modify the antennas. Damage to the coaxial portion of an antenna will reduce the performance of the antenna. Shortening or cutting off the 31mm tip will reduce the range.
Transmitter and Receiver Binding
Programming the AR637T receiver requires a Spektrum™ DSM2®/DSMX® compatible transmitter with Forward Programming.
The AR637T receiver must be bound to your transmitter before it will operate. Binding is the process of teaching the receiver the specific code of the transmitter so it will only connect to that specific transmitter.
Connect the optional SRXL2 remote receiver (SPM9747) if desired and any telemetry sensors to the main receiver.
Push and hold the bind button on the receiver while turning the receiver on. Release the bind button once the orange LED starts to flash continuously, indicating the receiver is in bind mode.
TIP: It is still possible to use a bind plug in the bind port if desired. This can come in handy if the receiver needs to be mounted in a location that is difficult to access, in which case a servo extension may be used for binding. If using a bind plug, remove after binding to prevent the system from entering bind mode the next time the power is turned on.
Put your transmitter in bind mode.
The bind process is complete when the orange LED on the receiver is solid.
Failsafe
In the unlikely event the radio link is lost during use, the receiver will enable the selected failsafe mode. Smart Safe + Hold Last is the default failsafe mode on the AR637T. Preset Failsafe and SAFE Failsafe modes are only available through Forward Programming.
SmartSafe + Hold Last
If loss of signal occurs, SmartSafe™ technology moves the throttle channel to the failsafe position (low throttle) set during binding. All other channels will hold their last position. When the receiver detects the signal from the transmitter, normal aircraft operation resumes.
Preset Failsafe
With preset failsafe, you can set the specific control surface positions you want to use if the signal is lost. When the receiver detects the signal from the transmitter, normal aircraft operation resumes. Preset failsafe mode is only available through Forward Programming.
SAFE Failsafe
SAFE Failsafe mode will work to automatically level your aircraft if the signal is lost. In the forward programming menu you can select the bank and pitch angles the aircraft will attempt to maintain during failsafe. We recommend setting bank and pitch angles so the aircraft flies a gentle gliding turn, preventing a flyaway. You must complete First Time SAFE Setup before this option is available. SAFE Failsafe mode is only available through Forward Programming.
Testing Failsafe
Secure the aircraft on the ground and remove the propeller. Test Failsafe settings by turning the transmitter RF output off and noting how the receiver drives the control surfaces.
Receiver Power Only
The servo ports will not have a control signal if the receiver is turned on when no transmitter signal is present.
All channels have no output until the receiver has linked to the transmitter.
Other Settings (Forward Programming)
System Setup
Select Forward Programming -> Other Settings ->
Initiate Receiver Bind Mode - Gives you the option of putting the receiver into Bind Mode from this menu.
Factory Reset - Select this option to put the receiver back to factory defaults. All settings will be wiped with this selection.
Restore From Backup - Select this option to re-instate the model file saved into backup.
Save to Backup - The AR637T can store a second model setup file for backup. Use this option if you want to store the settings you have while you test setup changes.
Importing Preset Model Files
Preset Model Files - This is a link to our public google drive which includes various model file presets that can be loaded on the receiver
Spektrum PC Programmer Software Required (Version 3.5 or higher) – Download HERE
Spektrum USB Programming Cable (SPMA3065) Required – Available HERE
Navigate to the corresponding Spektrum File Share Drive Folder for AR636 or Smart Receiver files
Locate the .SRM file for your model and Download via Right-Click or with icon – select Download
The file will be saved to your Downloads folder on your computer
Open the Spektrum PC Programmer Application – Download here and install application
Connect SPMA3065 Cable to PROG (programming) port on Receiver - You should see a message at the top right change to “Cable connected but no device”
Power on receiver
If using the USB for power (check box on top right), unplug servos, esc, etc and select Power Cable in the pop up window
In some cases, you need to click the Connect button on the PC App
If the app says there is a “model mismatch” and you do not want to lose any settings or are unsure, we suggest clicking on “Use Device Settings”
Once connected, select Models tab on the left
Import model file from Downloads folder – Import button at top right or drag and drop selected model from a folder to programmer window. The model file will be added to the PC Programmer and appear under “Other Devices”
Click Select or double click on the imported model to transfer to your Receiver. Once the transfer is complete the model will now show in bold under “This Device”
Power off and unplug the device. Confirm all control surface directions and AS3X responses.